Immich
Setting Up Immich
Immich is a self-hosted photo and video backup solution.
1. Creating the LXC Container
- Create a new Debian Bookworm LXC container on your Proxmox VE host with the following specifications:
- CPU: 4 cores
- RAM: 6 GB
- Storage: 20 GB
2. Setting Up Storage
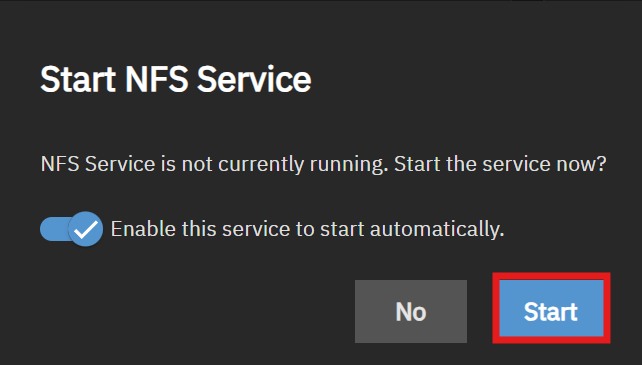
2.1. Creating an NFS Share on TrueNAS
-
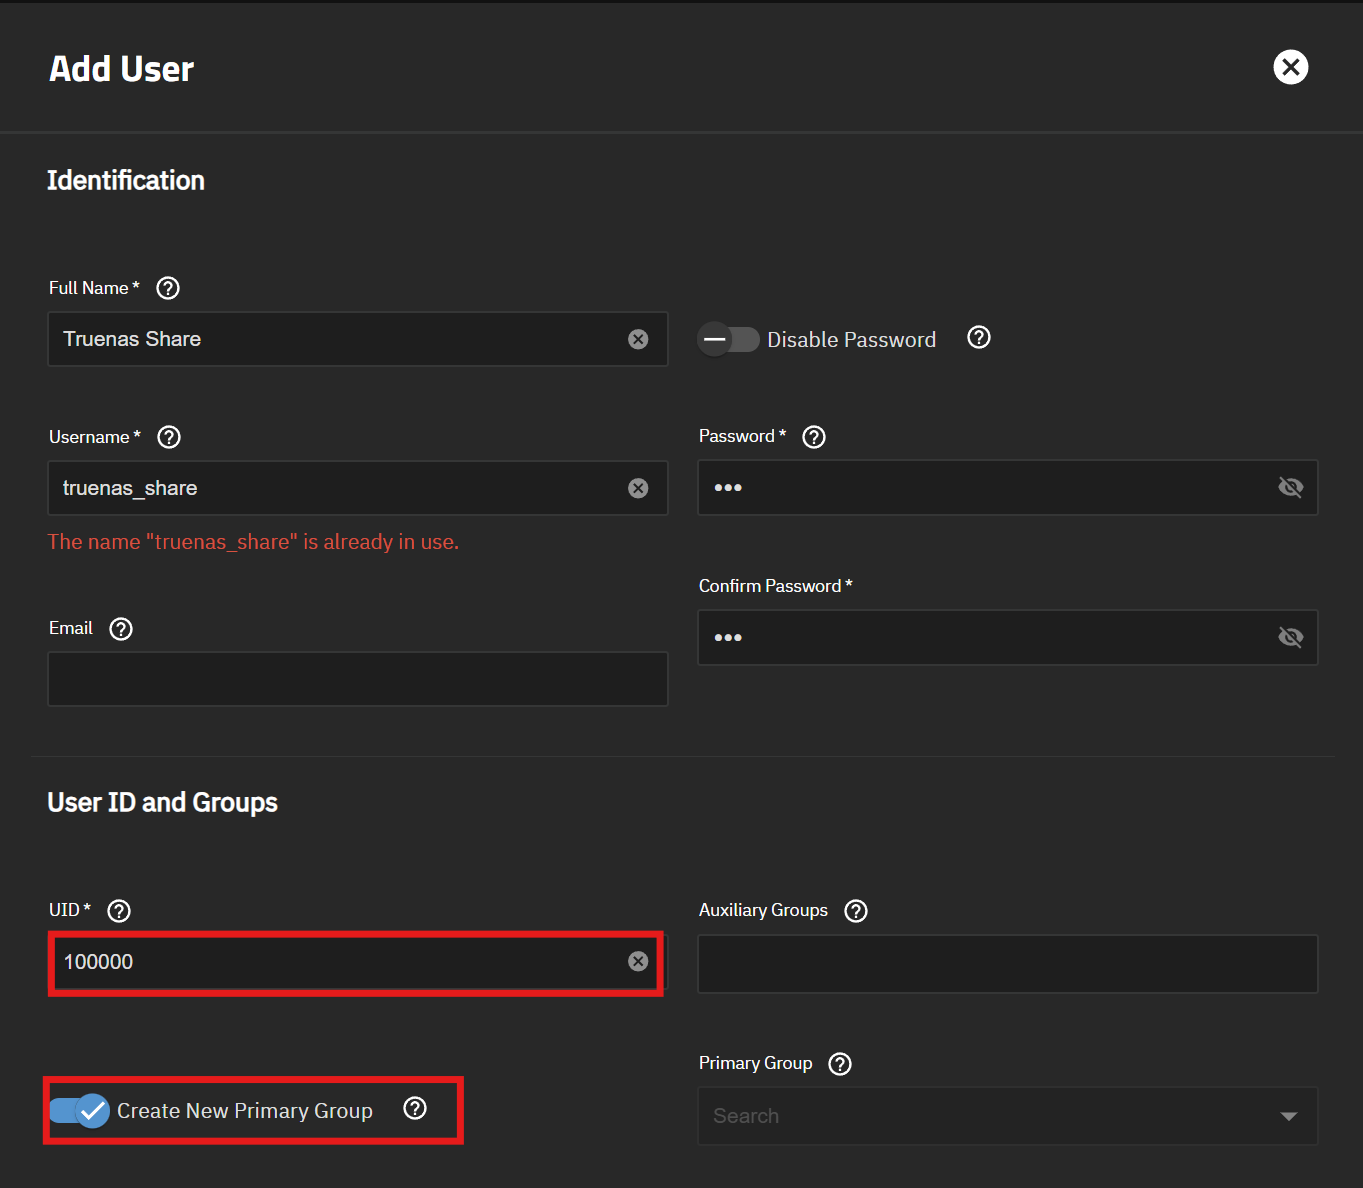
Create a new user and group on TrueNAS with the ID
100000.- This is necessary to give the LXC container write access to the share.
-
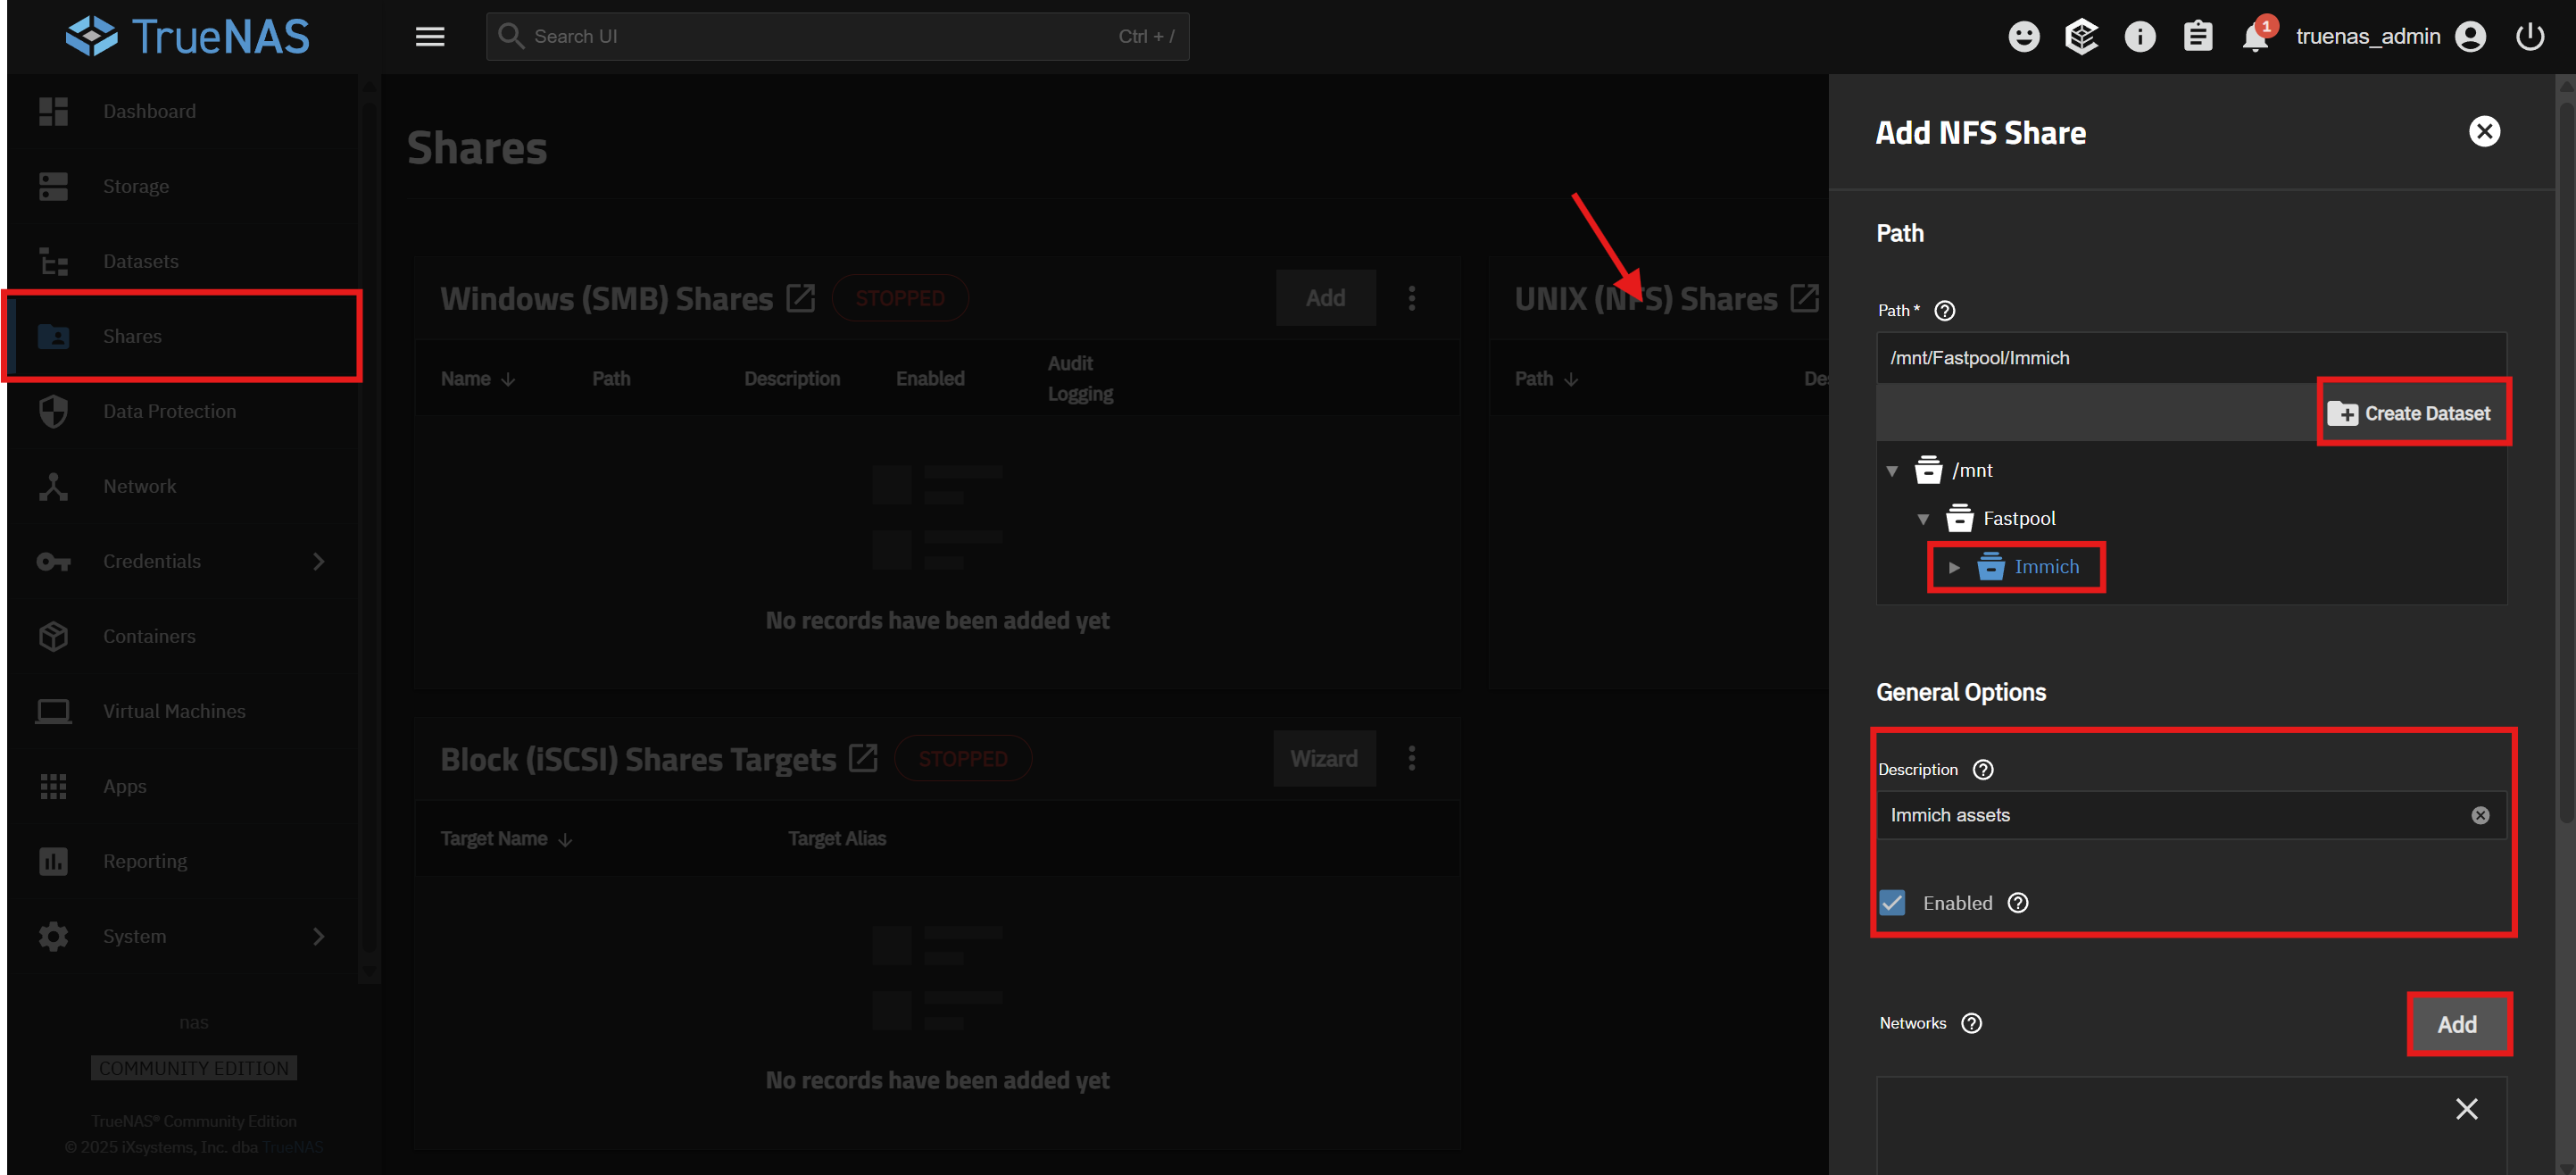
Create a new NFS share for your Immich media.
- Make sure to map the
rootuser to the user you just created.
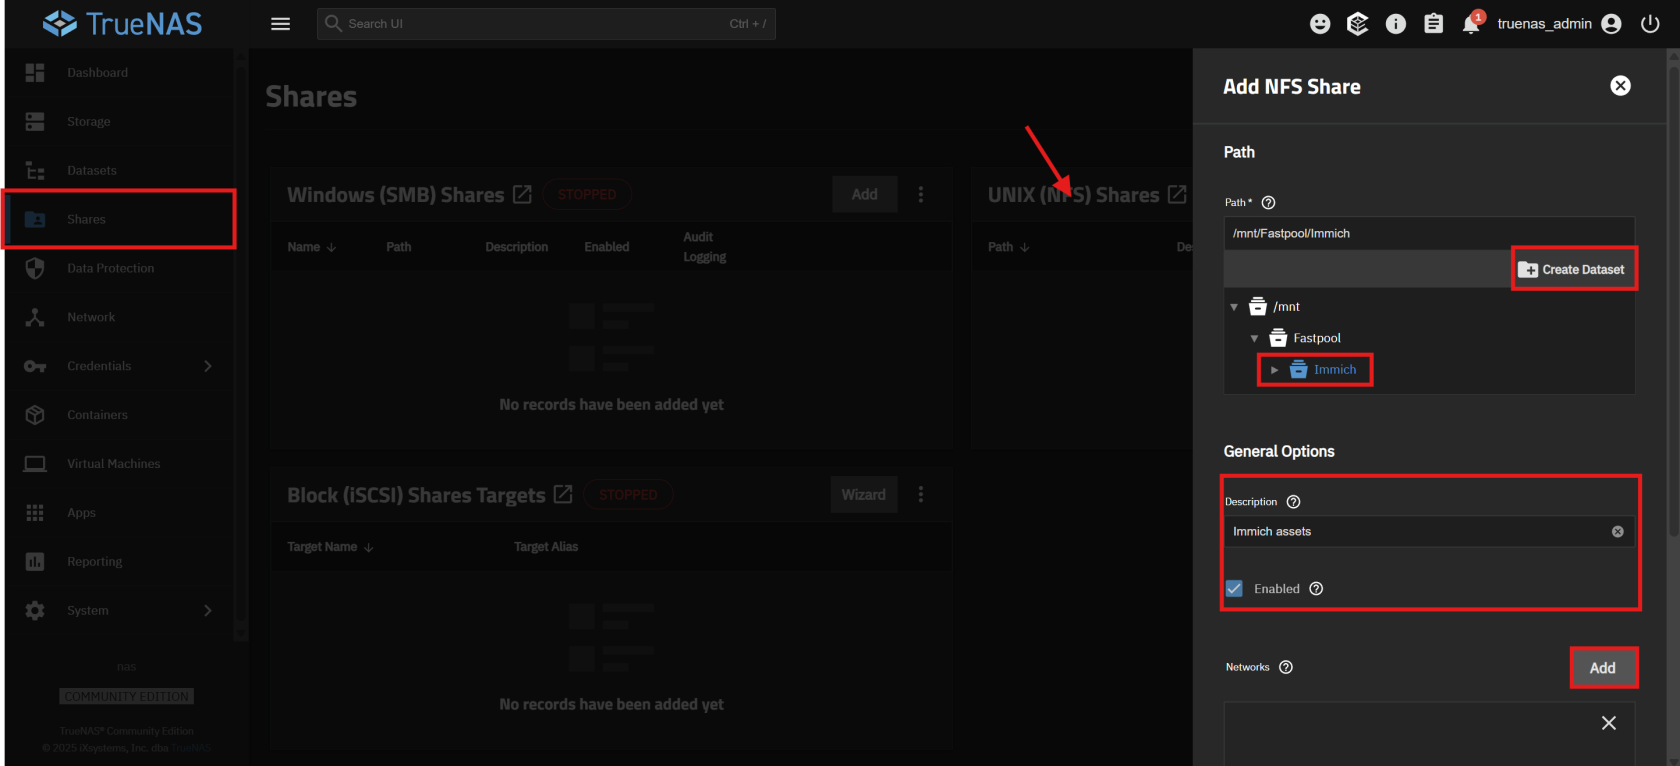

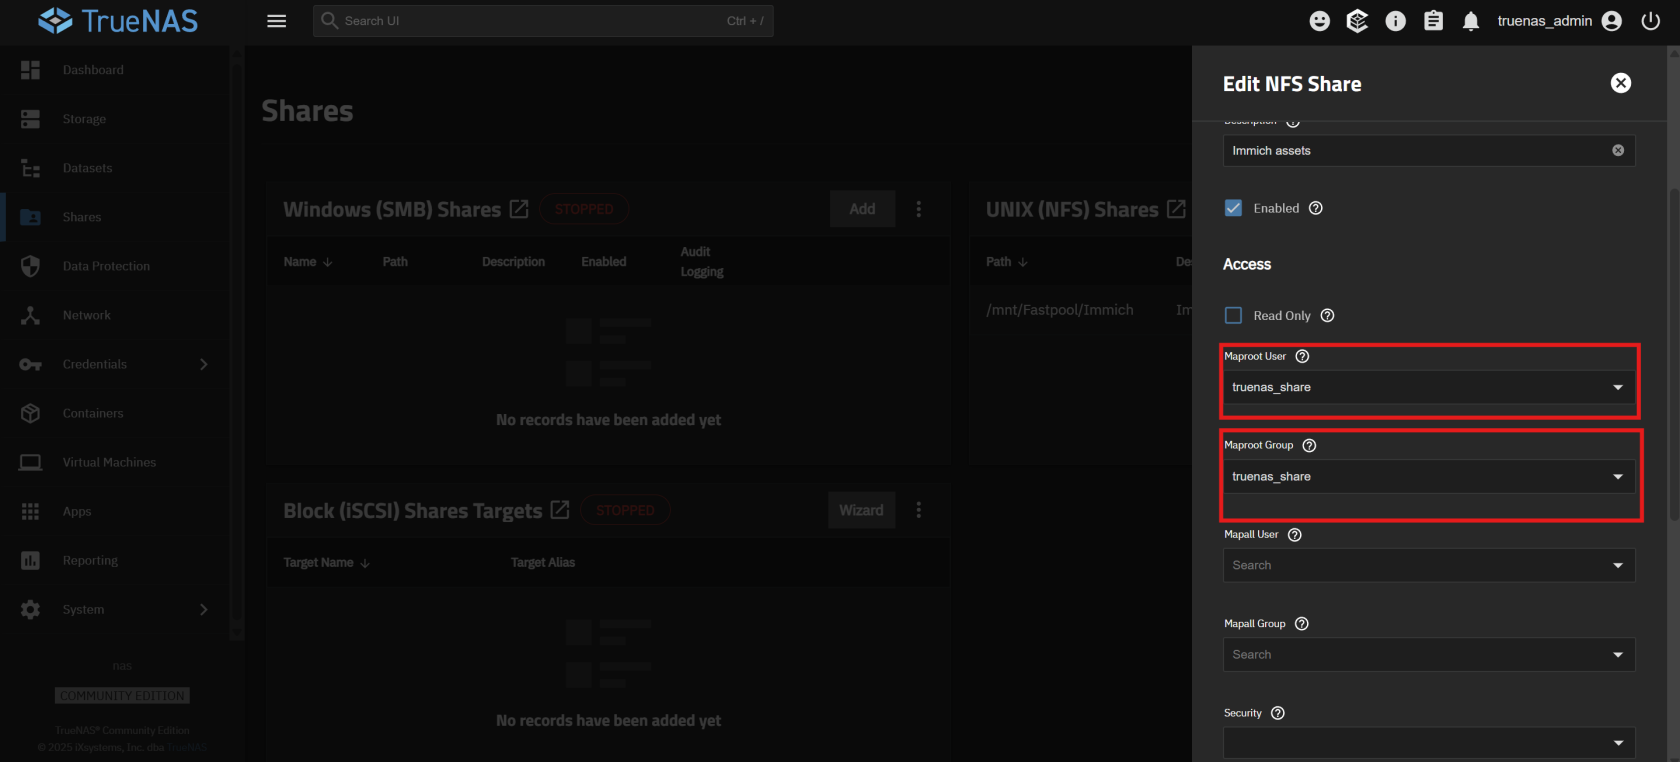

- Make sure to map the

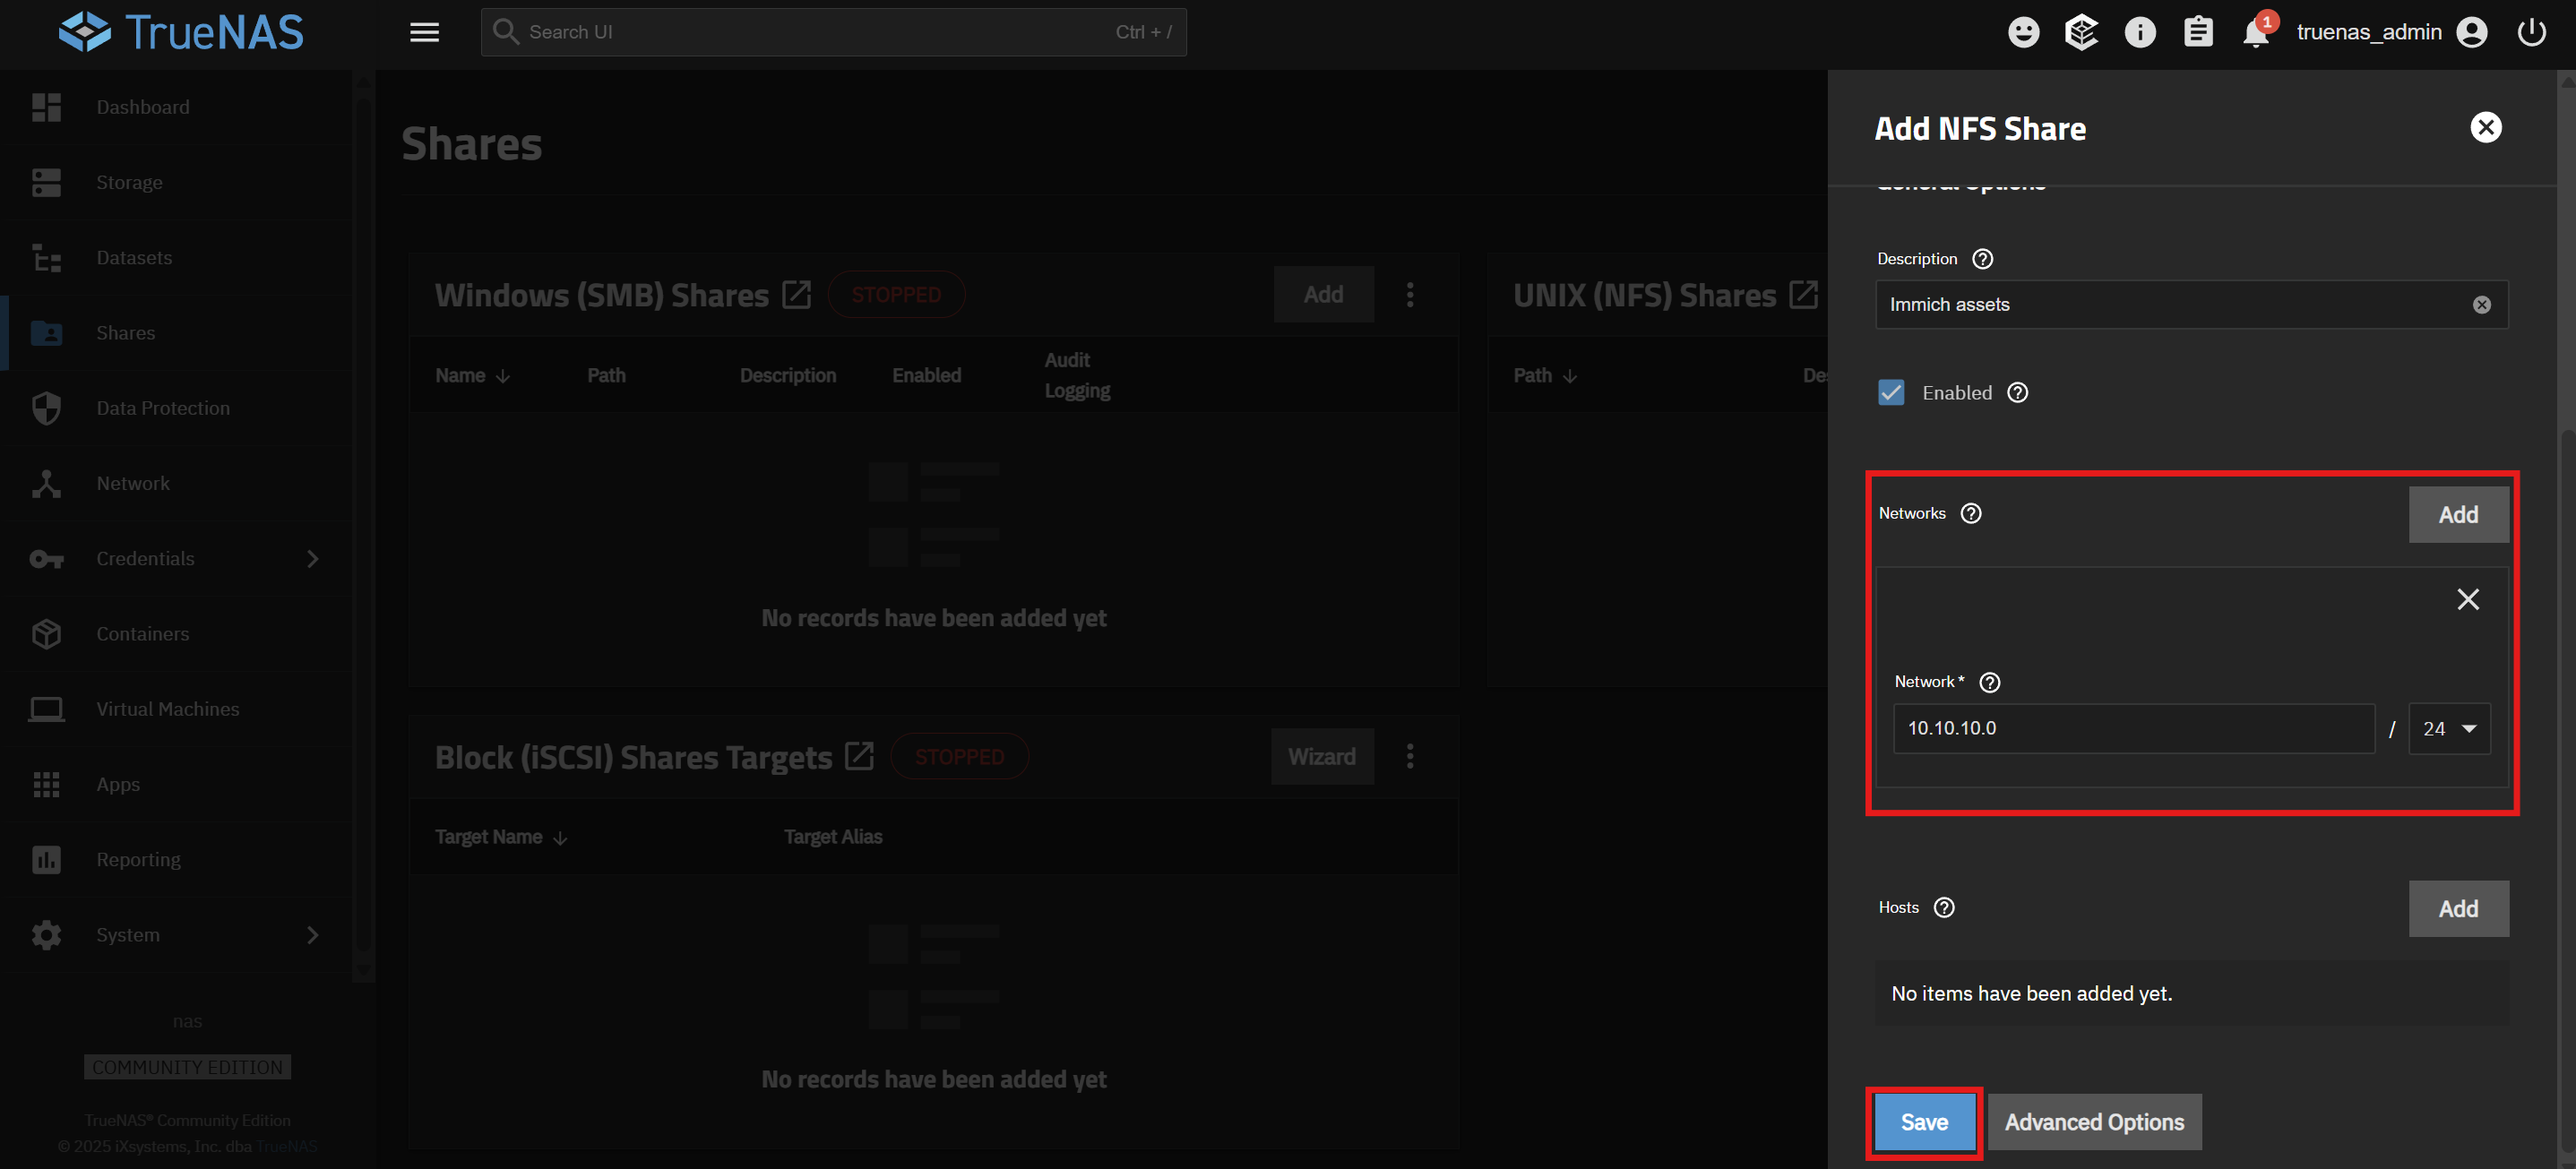

2.2. Mounting the NFS Share on the Proxmox Host
- Create a mount point on the Proxmox VE host:
mkdir -p /mnt/immich_nfs
- Add the following line to your
/etc/fstabfile to mount the share on boot:
<your-truenas-ip>:/mnt/Fastpool/Immich /mnt/immich_nfs nfs defaults,_netdev,bg,retry=10 0 0
- Reload the systemd daemon and mount the share:
systemctl daemon-reload
mount -a
2.3. Mounting the Share in the LXC Container
- Edit the LXC container's configuration file at
/etc/pve/lxc/<your-lxc-id>.confand add the following line:
mp0: /mnt/immich_nfs,mp=/mnt/media
- Create a systemd service on the Proxmox host to start the LXC container after the NFS share is mounted.
- Create a file at
/etc/systemd/system/immich-lxc.servicewith the following content:
- Create a file at
[Unit]
Description=Start Immich LXC after NFS is mounted
After=network.target mnt-immich_nfs.mount
Requires=mnt-immich_nfs.mount

[Service]
Type=oneshot
ExecStart=/usr/sbin/pct start 106
ExecStop=/usr/sbin/pct stop 106
RemainAfterExit=yes

[Install]
WantedBy=multi-user.target
* Enable and start the service:
systemctl daemon-reload
systemctl enable --now immich-lxc.service
3. Installing Docker
-
Log in to the LXC container's shell.
-
Install Docker Engine:
- Follow the official Docker documentation to install Docker Engine on Debian :
mkdir -p /etc/apt/keyrings
chmod 755 /etc/apt/keyrings

wget -qO /etc/apt/keyrings/docker.asc https://download.docker.com/linux/debian/gpg

echo \
  "deb [arch=$(dpkg --print-architecture) signed-by=/etc/apt/keyrings/docker.asc] https://download.docker.com/linux/debian \
  $(. /etc/os-release && echo "$VERSION_CODENAME") stable" | \
  tee /etc/apt/sources.list.d/docker.list > /dev/null

apt update
apt install docker-ce docker-ce-cli containerd.io docker-buildx-plugin docker-compose-plugin curl

docker run hello-world
4. Installing Immich
- Run the Immich installation script:
curl -o- https://raw.githubusercontent.com/immich-app/immich/main/install.sh | bash
-
Configure Immich:
- Access the Immich web UI at
http://<your-lxc-ip>:2283and create an admin user.
- Access the Immich web UI at
-
Change the storage location:
- Stop the Immich containers:
docker compose down - Edit the
.envfile and change theUPLOAD_LOCATIONto/mnt/media/. - Move the existing media to the new location:
mv library/* /mnt/media/ - Make sure that the new location's permissions match those required
- Start the Immich containers:
docker compose up -d
- Stop the Immich containers:
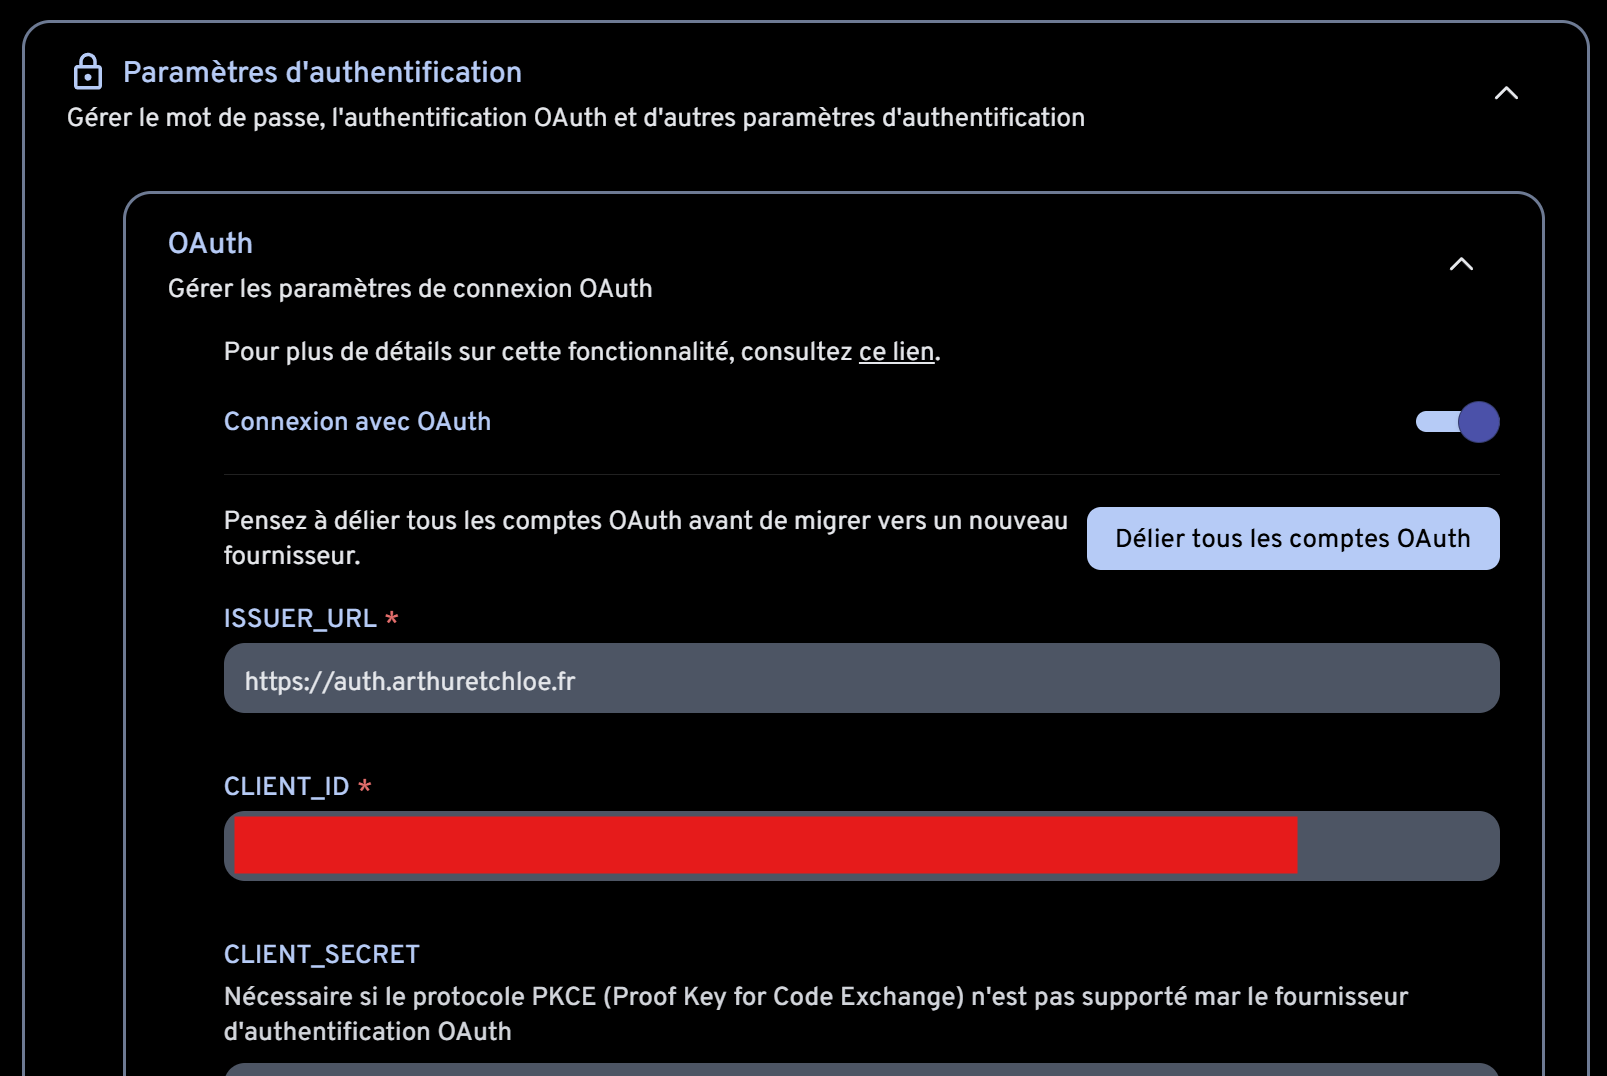
5. Configuring OAuth with Authelia
- Configure Authelia to recognize Immich as an OAuth client.
- Add the following to your
authelia/configuration.yaml:
- Add the following to your
#OauthID for immich
identity_providers:
  oidc:
    jwks:
      - use: sig
        algorithm: RS256
        certificate_chain: |
            -----BEGIN CERTIFICATE-----
            /etc/authelia/certs/cert.pem
            -----END CERTIFICATE-----
        key: |
            -----BEGIN PRIVATE KEY-----
            /etc/authelia/certs/key.pem
            -----END PRIVATE KEY-----
    clients:
      - client_id: 'immich' #Use randomized strings bor better security
        client_name: 'immich'
        public: true
        authorization_policy: 'one_factor'
        require_pkce: true
        pkce_challenge_method: 'S256'
        redirect_uris:
          - 'app.immich:///oauth-callback'
          - 'https://<your immich hostname>/auth/login'
          - 'https://<your immich hostname>/user-settings'
        scopes:
          - 'openid'
          - 'profile'
          - 'email'
        response_types:
          - 'code'
        grant_types:
          - 'authorization_code'
        token_endpoint_auth_method: 'none'
- Enable OAuth in Immich:
- Edit your Immich
docker-compose.ymlto add your certificates and point to your authelia host :
- Edit your Immich
services:
  immich-server:
	container_name: immich_server
	image: ghcr.io/immich-app/immich-server:${IMMICH_VERSION:-release}
	# extends:
	#   file: hwaccel.transcoding.yml
	#   service: cpu # set to one of [nvenc, quicksync, rkmpp, vaapi, vaapi-wsl] for accelerated transcoding
	volumes:
	  # Do not edit the next line. If you want to change the media storage location on your system, edit the value of UPLOAD_LOCATION in the .env file
	  - ${UPLOAD_LOCATION}:/data
	  - /etc/localtime:/etc/localtime:ro
	  - /immich-app/trust-chain.pem:/certs/trust-chain.pem
	env_file:
	  - .env
	ports:
	  - '2283:2283'
	depends_on:
	  - redis
	  - database
	restart: always
	healthcheck:
	  disable: false
	environment:
		NODE_EXTRA_CA_CERTS: /certs/trust-chain.pem
	extra_hosts:
		- "<authelia hostname>:<NGINX proxy manager IP>"
- In the Immich web UI, navigate to Administration > Settings > OAuth and enable OAuth.
- Fill in the following details:
- Issuer URL:
https://auth.yourdomain.com - Client ID:
immich - Client Secret: (leave blank)
- Issuer URL:
Next Steps
With Immich set up, you can now proceed to install BookStack.
No comments to display
No comments to display